↲ FRONT PAGE ↲ I2M PAGE
Image 2 Mesh - Guide / Documentation
Basics / FAQ
What's the difference between 'Standard' & 'Pro' version?
The "Pro" (paid) version is intended for professionals / studios / companies that may want to be able to rely on guaranteed & prioritized support - and generous supporters in general!
The "Standard" version is no longer updated.
I2M v2.x
With version 2 I2M was completely rewritten, streamlined and optimized:
- It has fewer features than the previous 1.x pro version
- It is up to 10x faster.
- It is currently only available in the Pro tier
- Previous Pro versions are still available for download for Pro users
- Standard tier is limited to version 1.3x
- Standard & Pro pre-2.0 versions will no longer be updated or supported
You can find the Standard Version (Pre 2.0 Documentation): HERE
How do I install I2M?
Standard ("legacy") Blender add-on installation. I2M is not an extension.
- Please read the Blender Documentation regarding add-on installation.
- General Blender functionality is out of scope for this guide and I2M support.
- Please direct beginner Blender questions to an appropriate forum.
Before you begin
I2M works best with images with an Alpha-channel.
If you want the transparency cut out - please make sure your image actually has an Alpha-channel.
Note: You can also import images without alpha (as single quad planes). (as of 2.04)
You can also use a specified RGB-value ("a color") instead of Alpha. See below.
- "What is an "Alpha-channel" & How do I make sure there is one?"
General image handling is out of scope for this guide and I2M support.
Please direct image format questions to an appropriate forum.
- "Can I import movies?"
I2M does not support any movie format. However, this method might be of interest.
Documentation
Step-By-Step
A simple "First Time" guide to get you started: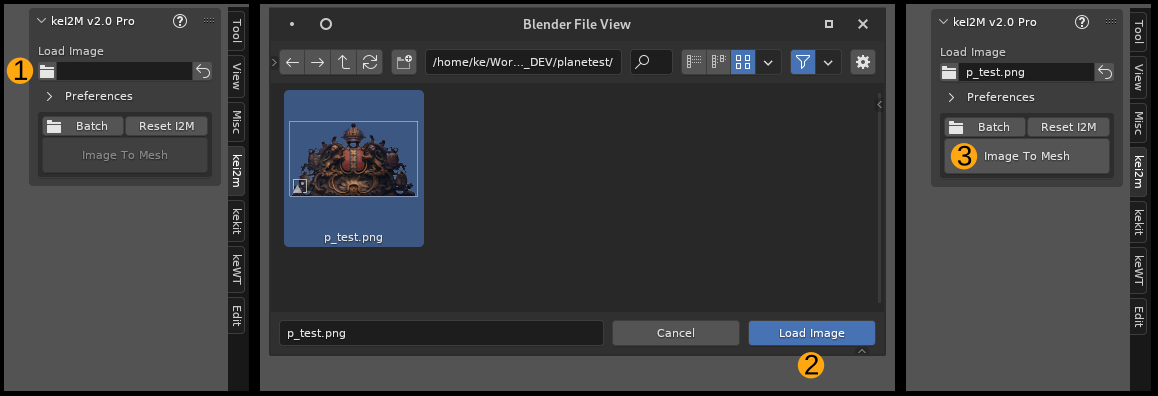
1. Click the Load Image(s) folder button.
2. In the pop-up browser; Select an image and then click Load Image.
3. Click the "Image To Mesh" button to generate a mesh from the loaded image.
- A mesh object should now be generated at location 0,0,0.
- Objects are created to face the FRONT view (XZ orientation. Default shortcut: Numpad 1)
- The generated object will have UV texture projection automatically setup by default.
UV-projection is useful for further modeling without having to deal with UV's.
If no objects are created, you can use the support form, assuming you have read & followed all the information in this guide. Include any image used as an attachment, if possible.
Settings
After running "Image To Mesh" - you can tweak the settings in the Redo Panel:Note: Images without Alpha (if not using 'RGB as Alpha') will have limited redo-options.
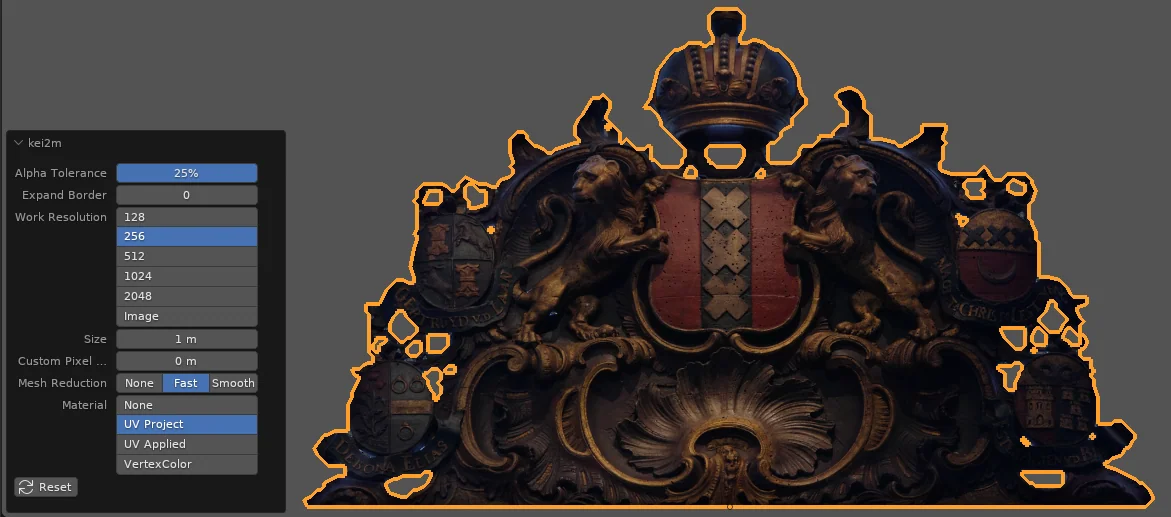
Alpha Tolerance
Determines the cut off point off the alpha value, in percent.Use numerical keyboard input (Slide operation disabled to avoid accidental lock-ups)
Tip: Should the Tolerance & Expand options be insufficient, you may need to manually adjust the alpha in an image editing app.
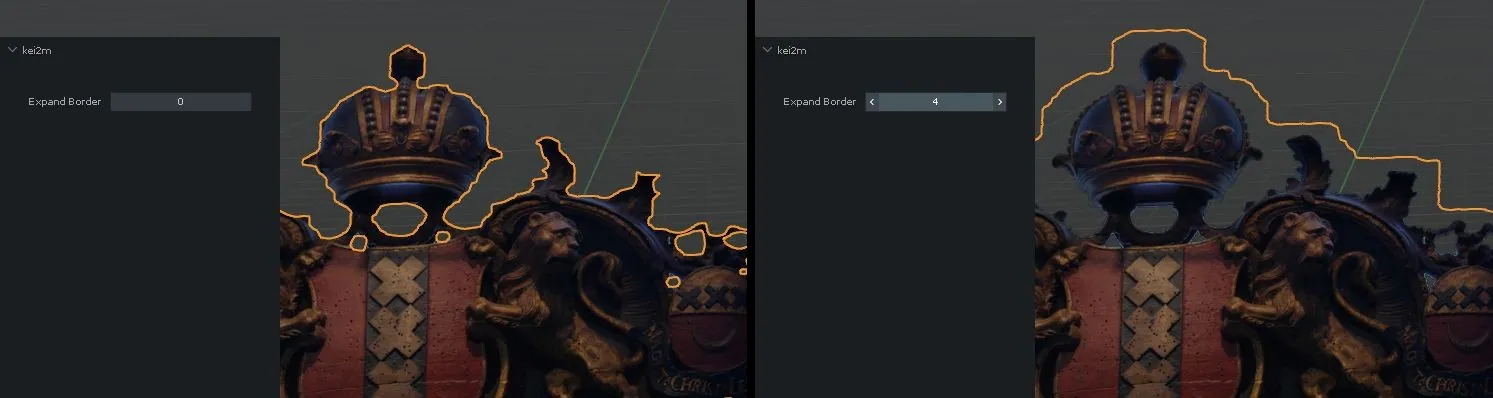
Expand Border
Expands (or contracts, if negative) alpha cut-off point beyond the original alpha borders.In pixels (roughly). Zero to disable.
Use numerical keyboard input (Initial arrows/slide operation disabled to avoid accidental lock-ups)
Tip: Tweak Opacity Tolerance value first - only use Expand Border if necessary.
Work Resolution
Work Resolution refers to the internal pixel resolution used by I2M, which 99% of the time can be lower than the actual resolution of the image - for performance reasons.Keep this value as low as you can. Increase to ensure you have the necessary border detail level.
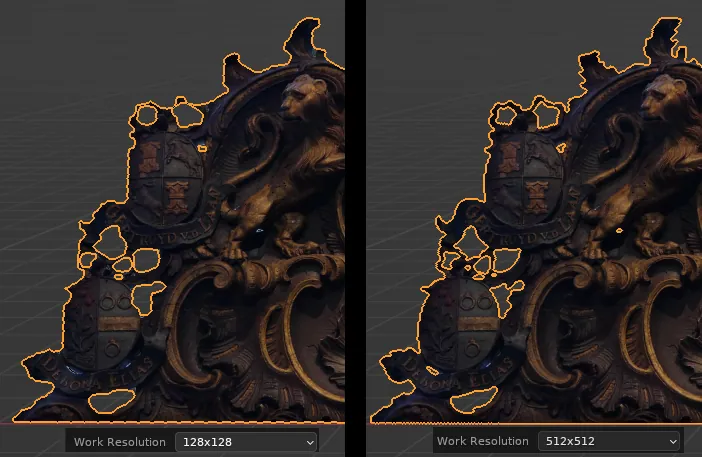
NOTE: The last used Work Resolution will be used for any additional image(s) as well, unless you click the "Reset To Defaults" button or load a new scene.
Size
By default the mesh will be 1BU = 1m (or 3.28084 ft). Change value to adjust. (Zero will reset to 1BU)Custom Pixel Size
By default the pixel size will be calculated from the object size. Change value from zero to override and use a custom pixel size and auto-calculate the object size instead.Mesh Reduction
This will determine how the contour and interior of the mesh is processed: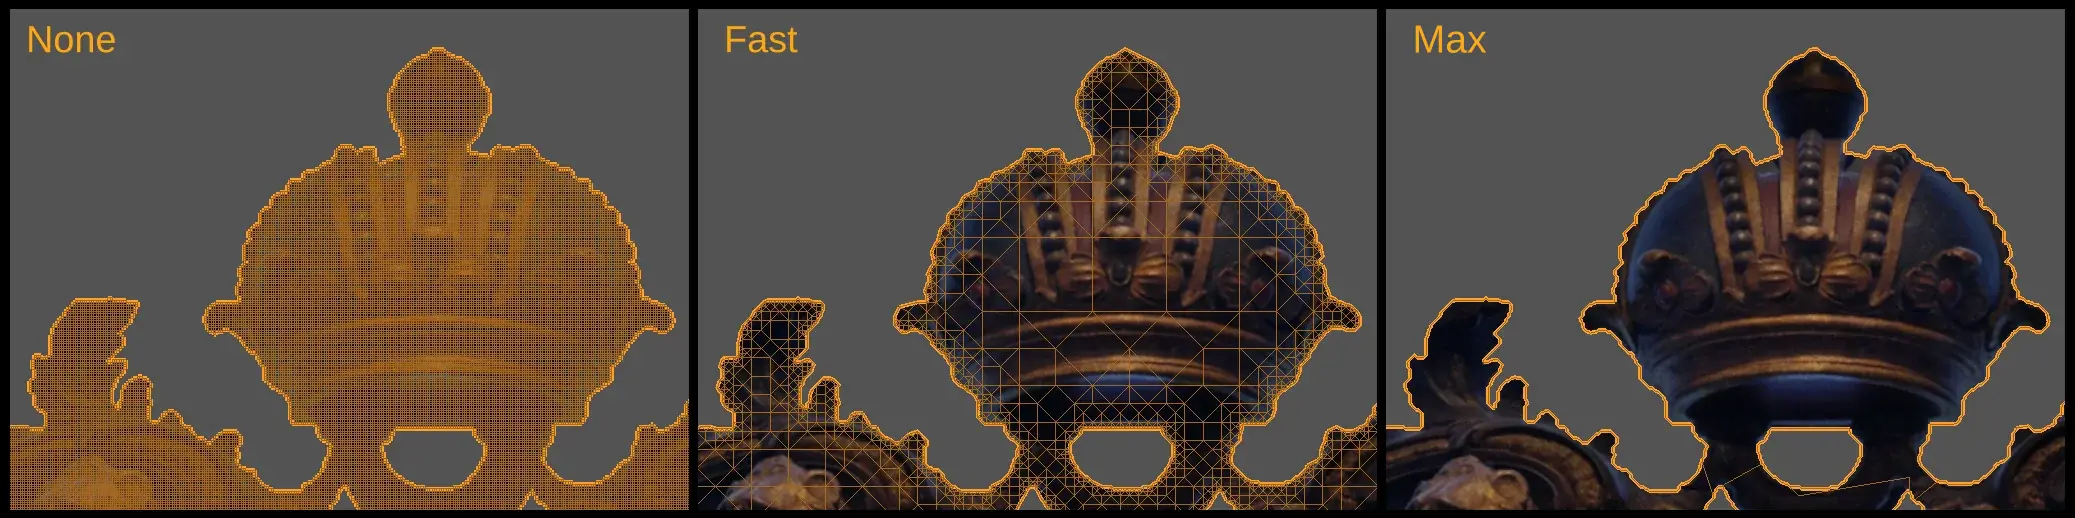
Tip: In most browsers, you can enlarge any image in this guide by Right Mouse button clicking the image and choosing "Open In New Tab".
None : Fastest & No reduction - Very high polycount: 1 work resolution pixel = 1 face!
Fast : Fast & Simple reduction - Medium poly count
Max : Slower & maximum reduction - Low poly count
Note: The complexity of the Alpha will have an effect on the processing time. High frequency detail / noise will increase processing time & mesh complexity. This is an example of complex alpha.
Material
Choose how (or if) to apply the image as a texture on the generated meshNone
No texturing at all - only creates geometry
UV Project
Default setting. Automatically sets up a UV projection modifier and parents an Empty to the generated object, using the source image as texture to project.
UV Applied
Automatically apply the projected UV modifier (& remove the Empty) - "baking" the UV's.
Vertex Color
Uses Vertex Color instead of a texture - Aka 'Retro Pixel Graphics Mode'. Each Work Resolution pixel makes up one face. The shading mode will be set to display Vertex Maps automatically. Mesh Reduction will be set to "None".
Reset
Restores the default I2M settings. Also available in the N-panel as a separate operator (no image required). - - -
Batch
Select MULTIPLE IMAGES with the Batch file-browser to process in sequence.Toggle the 'Use Dir' option (in the file-browser window) to select the entire directory.
Batch mode does not have a redo-panel:
- By default, I2M uses the previously used settings = Run one image first in regular single image mode to define the operator properties - that will then be used in Batch Mode.
- Optionally: Use Persistent Props, to setup a preset. (Read more below).
- - -
Add-on Preferences
The following options, intended for customizing workflows, are available in Add-on preferences for I2M: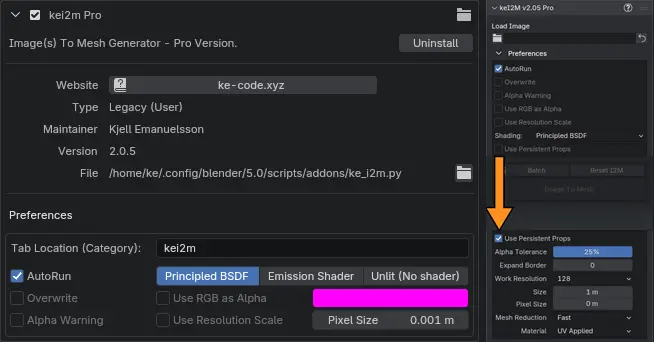
Tab Location: Override the default "kei2m" tab name to relocate the add-on on the n-panel.
AutoRun: Immediately run I2M after loading an image
Overwrite: Will only allow one object per image (name) - useful for image iteration
Shader options: Pick which shading setup (BSDF, Emissive or Unlit) is created by I2M
Note: Unlit = The same material setup as (Blender's) Image to plane's "Shadeless" option.
Use RGB as Alpha option:
- Click the checkbox to activate this option.
- Click the color field to specifiy which color is to be used instead of Alpha.
Use Resolution Scale:
This will automatically set the object scale to match the image resolution, using a user defined unit (meter / Blender Unit) per pixel value. Example: The pixel value at 0.001m on an image 1920pixels wide will result in a mesh 1.92m wide. Note: This option will disable other size options.
- Click the checkbox to activate this option.
- Set the pixel value to be applied to the image resolution
N-Panel Prefs: The preferences (except tab name) are also available in the n-panel for quick access.
Note that Persistent Props are ONLY available in the n-panel prefs.
Use Persistent Props:
When this option is ON, the I2M operator properties can be set as a preset in the n-panel.
Useful if you always use the same values, and don't need to adjust settings.
Works for both single & batch mode. These props are stored persistently.
Note: This also disables the redo-panel in single mode
Reminder-Tip: You can mouse-over almost any item, such as buttons, for tooltips.
[EOF]